Price data point: how to filter, sort, or show price in the results
When you’re trying to sell something, your ultimate goal is to ensure your clients leave your site satisfied and with their wallets a little lighter rather than gritting their teeth in frustration, ready to write you a devastating review on Yelp. And the best way to do it (besides providing them with good products under decent prices which is a given really) is to make all the info about what you’re selling readily available. Not hidden behind passcodes, trapdoors, moats and mazes, like the secret treasure of a particularly greedy dragon.
So now that you’ve had your website’s content crawled, decided where the search bar should be placed and chosen its color palette, it’s time to make all that helpful info appear in your search results. And we have just the things for that. Data points!
Data points are reoccurring bits of information within your product pages that you would like to highlight in the search results. It can be your product’s rating, availability, brand, size, color, technical parameters etc. Whatever is most relevant to your customers. In this guide we’ll focus on the price data point, but keep in mind that it can be pretty much anything.
When you add data points via the SS360 control panel, our crawler will pick up these data points while indexing your website and transform them into structured data. This data can then be used to enrich your result snippets (when shown underneath the title of the result) or to be turned into a filter or a sorting option across your search results.
Price can be both of those things if that’s something you’re looking for! Your customers can therefore either easily see the price of each of your products or even filter them by price to get whatever results best correspond with their needs.
Data points can be tricky, especially when you set them up for the very first time, but let’s clear things up, shall we?
To create a filter or a snippet using your “Price” data point, you’ll need to follow four simple steps:
- Point the crawler to the price of any product by using XPath or CSS.
- Use that XPath or CSS selector to set up your data points.
- To show price in the result snippets, choose the “Text” data type for the extracted data point and make it visible.
- To add a price range slider, choose the “Number” data type for the extracted data point and use it as a Filter.
Doesn’t look so scary now, does it?
Let’s get to it.
Step 1. Extracting the XPaths.
To get to work on those data points, you will first need to point the crawler to the relevant elements on your website. It can be done with XPaths or CSS (if you enable "Prefer CSS" toggle under your initials in the top-right corner of the SS360 control panel):

In this guide, we'll show how it can be done with XPaths.
In short, XPaths are expressions that allow you to identify elements on your page. The easiest way to extract them would be to use the Google Chrome extension called "XPath Helper". If you’re interested, you can learn more about XPaths in our docs.
Click on the extension icon to activate it, then hold the [Shift] key and hover your mouse over the desired element on your page. Remember that you need to shorten the XPath expression shown in the top left box by removing irrelevant elements from the top and sometimes from the end of the query to make it more generic and applicable across all your site pages (and not just the specific one you’ve selected).

Step 2. Setting up data points.
To set up new data points you will need to go to Data Structuring -> Data Points in the SS360 control panel.
Click "Add New Data Point" and fill out the template with your info. That XPath you copied will need to go to “XPath” underneath “Data Type” and “Data Point Name”.
Just a side note: we have embarked on this journey first and foremost to discuss two major ways of using your price data point, but let’s circle back a little. Filters are one of the coolest features that Site Search 360 offers, but they’re only available to those on our HOLMES plan and higher (if you want to learn more the difference between all the plans that we offer, you can check out our Pricing page). So to leave no customer behind, we’ll start with a feature everybody has access to — result snippets. Those are pretty impressive too :)
2.1. Adding a text data point for a price snippet in your search results.
If you want to show your “Price” data point in a search snippet, you will need to select “Text” as your data type for the currency to be shown and click on “Make it visible within one or more Result Groups”.
You can see whether you’ve done everything correctly by copying and pasting any page address in “Test URL” and clicking “Load”.

2.2. Adding a numerical data point for a price filter.
To set up a price filter you will need to select “Number” as your data type. Otherwise you won’t be able to implement the nifty sliding scale that was originally shown. You can also use those for rating, size dimensions, coordinates, or any other piece of numeric information.
Selecting “Create New Filter” will automatically add a filter for this data point. Selecting “Create a New Sorting Option” will automatically configure an additional sorting strategy.
By default, all results are sorted by Relevance, but if you want to, you can allow your customers to also sort them by Price (and choose between the two).

Step 3. Adding price to your search snippets.
Snippets are small text excerpts created dynamically from the result page content. They highlight the matched search term and the text around it. However, you can add data points (such as your products’ prices, colors, materials, etc.) to enrich the default snippets.
Creating Result Groups is covered in detail in a separate guide - just keep in mind that by default, all your results are mixed together. As soon as you create a dedicated group for your products, videos, or FAQs for example, we'll automatically add two more tabs: “All Results” and “Other” (= uncategorized). You can hide or rename them when designing your search UI.
If you don't have any groups yet, the Text data point you’ve already set up will appear in all result snippets that match your setup condition.
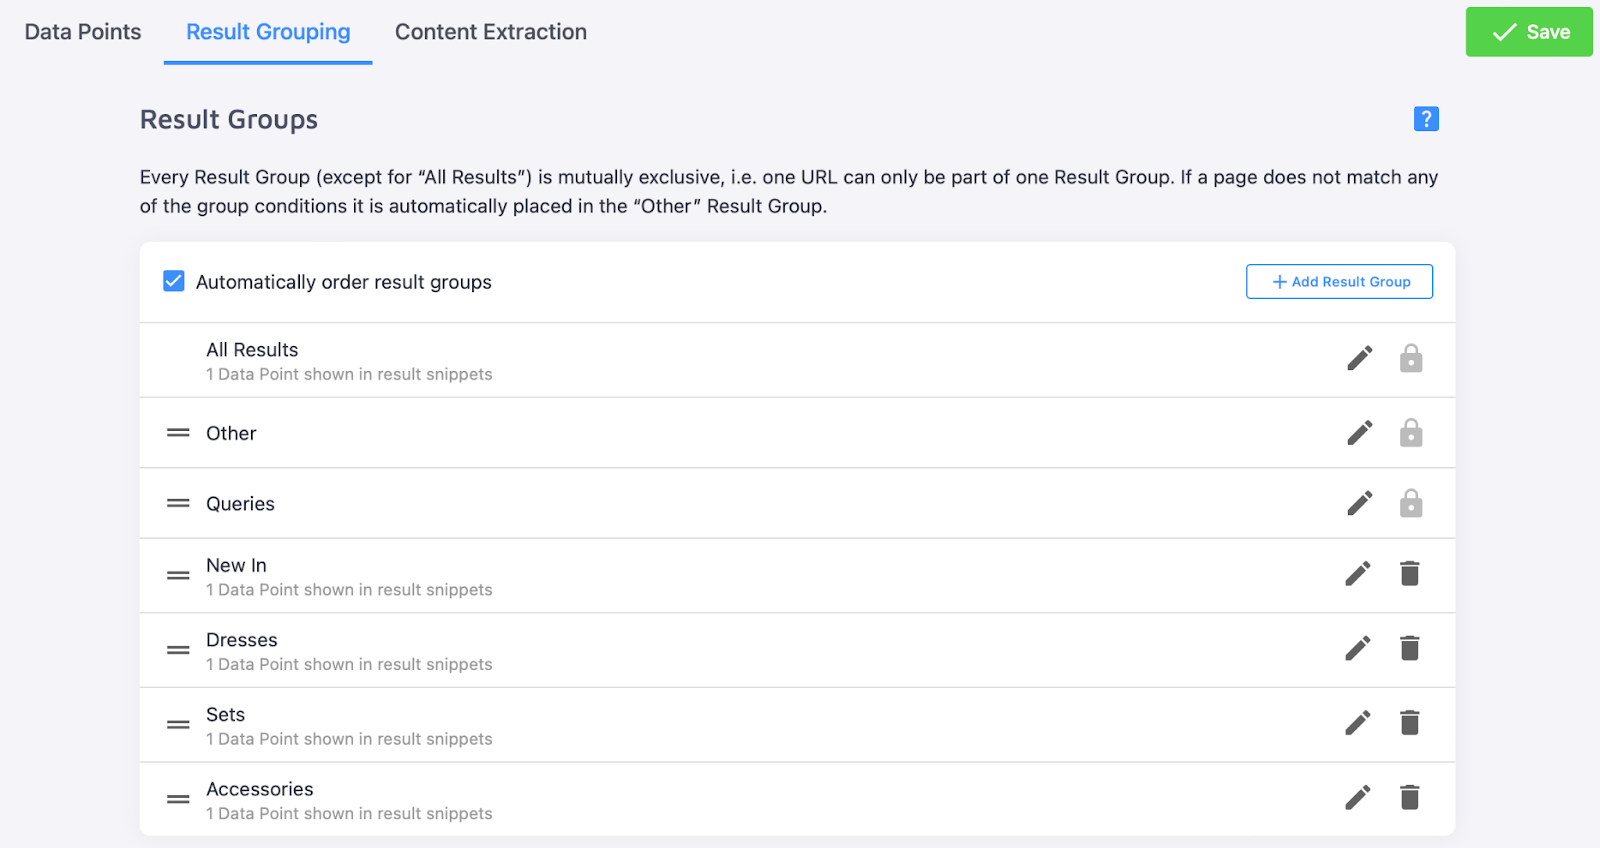
To show data points in specific groups go to Data Structuring -> Result Grouping and click on the desired group (say, you want to show size in “Dresses” and not in “Accessories”).
Press the “Edit” pencil icon and proceed with selecting an existing data point. This will automatically create a snippet that would show up exactly where you want it to.
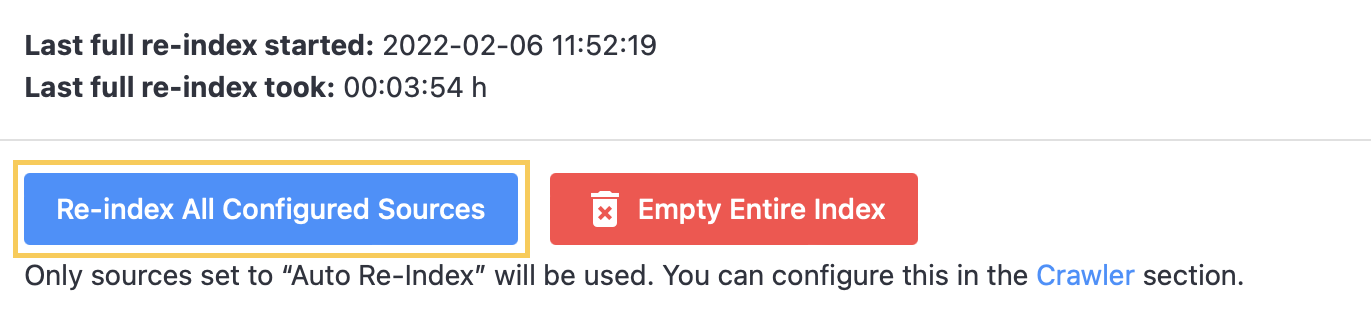
Once you’re done, just click “Save” and remember to re-index the project to apply your changes (either by pressing on the pop-up at the top right corner of the page or going to Index -> Content List, scrolling down and clicking the “Re-index All Configured Sources” button underneath the Index Log).
Step 4. Fine-tuning your filter.
Once you set up that numeric data point, the filter should be created automatically, which you can check out immediately after reindexing your project if you go to Filters and Sorting -> Filters. You can also create filters and sorting strategies manually based on one or several data points.
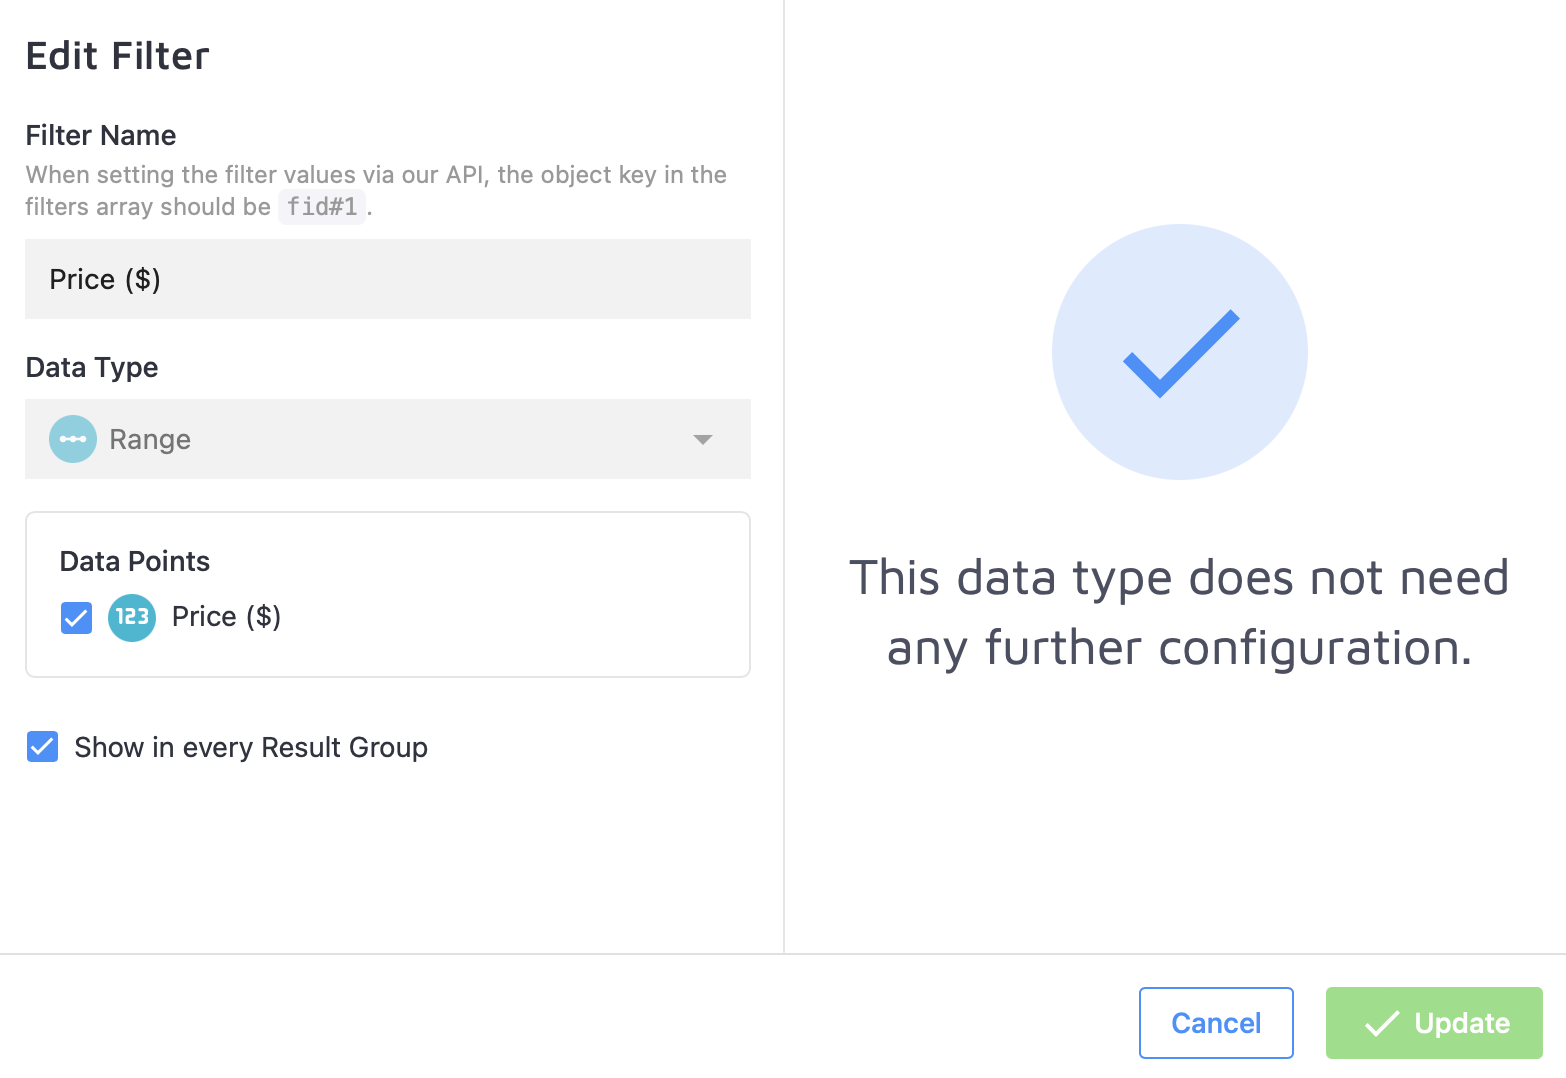
You can always customize the filter’s name and data type. There are two types of filters that can be of use to you when adding price: range filters and multiple choice or multi-select filters. Price works best with range filters because the choice is dynamic rather than static (you clients can choose a price range instead of ticking off every box for their desired price category like with multi-select filters).
Once the name and the data type are configured, simply activate the toggle on the immediate right of the filter’s name and click “Show in every Result Group” for the filter to be readily available across your entire website or select a specific group if the filter only applies to a subsection of your site. For example, you might want to show the price filter for your products while hiding it for other types of content (result groups) such as Blog posts, PDF guides, YouTube videos, etc.
Make sure to select an appropriate data point. In this case, that would be the numeric one you’ve created two steps ago.
You can also choose whether you want the sorting of your search results to be ascending (from the lowest to highest price) or descending (from the highest to the lowest price) depending on the price each product has under Sorting. Remember that you can change it anytime.

Make sure to re-index your project once again when you’re satisfied with your filter!
Step 5. Seeing your data points in action.
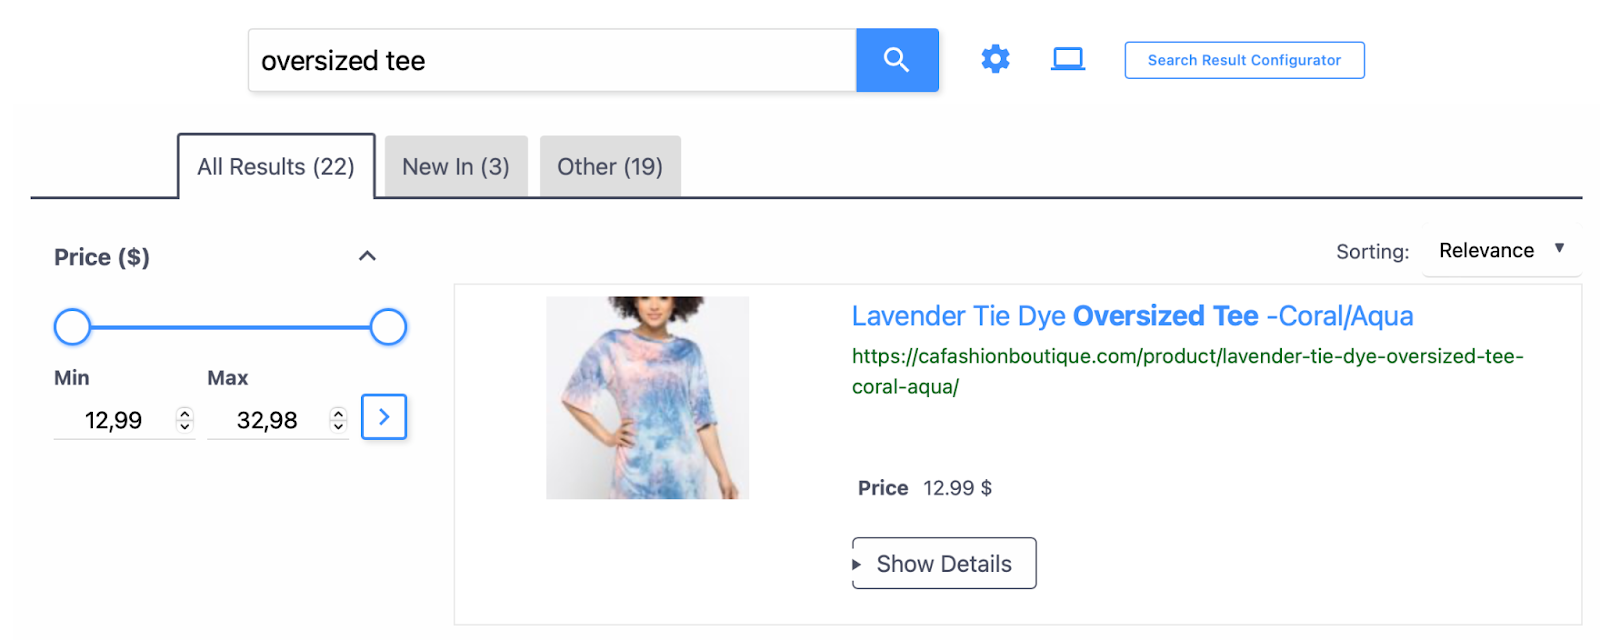
Now that the hard part is over, you can confidently give your filter and/or search snippet a whirl!
Just go to Search Preview and type in anything you have in mind. The filter will appear on the left and the snippet will be visible under each indexed product.
If you need any help, don’t hesitate to reach out to us.